> ## Documentation Index
> Fetch the complete documentation index at: https://docs.tryorato.com/llms.txt
> Use this file to discover all available pages before exploring further.
# Batch Calling
## What is the Batch Calling?
Batch calling is how you run high-volume outbound operations in Orato. Instead of calling one person at a time, you upload a list of contacts, assign an AI Assistant, and Orato calls every person in that list automatically, at whatever pace you set.
All of this happens through **Campaigns**.
 ***
## How batch calling works
Go to **Leads** and create a Lead Batch. This is the list of people your assistant will call.
You can add contacts manually or upload a CSV. Your CSV needs at minimum a `phone_number` column, but you can add more columns that get passed to your assistant as personalisation variables.
```csv theme={null}
phone_number,name,company,plan
+14155551234,Sarah Chen,Acme Corp,Pro
+919876543210,Priya Sharma,Zest Ltd,Starter
+14155559876,James Patel,Orbit Inc,Pro
```
All numbers must be in international format. `+1` for the US, `+91` for India. Numbers without a country code won't connect.
Go to **Campaigns** and click **+ Create Campaign**.
***
## How batch calling works
Go to **Leads** and create a Lead Batch. This is the list of people your assistant will call.
You can add contacts manually or upload a CSV. Your CSV needs at minimum a `phone_number` column, but you can add more columns that get passed to your assistant as personalisation variables.
```csv theme={null}
phone_number,name,company,plan
+14155551234,Sarah Chen,Acme Corp,Pro
+919876543210,Priya Sharma,Zest Ltd,Starter
+14155559876,James Patel,Orbit Inc,Pro
```
All numbers must be in international format. `+1` for the US, `+91` for India. Numbers without a country code won't connect.
Go to **Campaigns** and click **+ Create Campaign**.
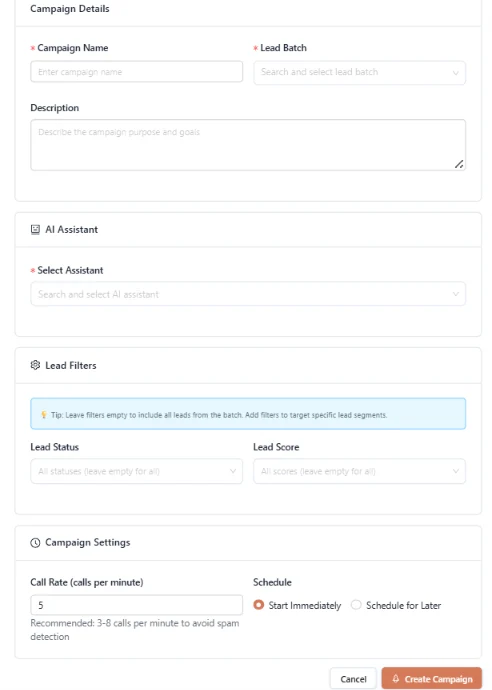 Fill in:
* **Campaign Name**: e.g. *"June Outreach — Renewal Leads"*
* **Lead Batch**: pick the batch you just created
* **AI Assistant**: choose the assistant that'll handle the calls
* **Lead Filters**: optional; filter by lead status or score to target a segment of your batch
* **Call Rate**: set between **3 and 8 calls per minute** (recommended)
* **Schedule**: start immediately or pick a date and time
The call rate controls how many calls are made per minute. The dashboard recommends **3–8 calls per minute,** specifically to avoid spam detection by mobile carriers.
| Call Rate | Effect |
| --------- | ----------------------------------------------------- |
| 1–3/min | Very safe, but slower |
| 3–8/min | Recommended, good balance of speed and deliverability |
| 8+/min | Risk of carrier spam flags and lower answer rates |
Don't go above 8 calls per minute. You won't finish faster — carrier spam filters will reduce your connection rate, and you'll waste calls.
Click **Create Campaign**. If you set it to start immediately, your assistant starts dialing straight away. You'll see the progress bar start moving on the Campaigns page.
***
## Monitoring while it runs
Once your campaign is running, click on it to open the detail view:
* **Progress bar**: calls completed out of total contacts
* **Results breakdown**: how many connected, how many are qualified, failed, or unanswered
* **Live Updates toggle**: turn this on in the Calls page to see call results as they come in
***
## Campaign statuses
| Status | What it means |
| ----------- | ----------------------------------------------- |
| `Running` | The campaign is actively making calls right now |
| `Completed` | All contacts in the batch have been called |
| `Cancelled` | The campaign was manually stopped |
***
## Personalizing calls in a batch
If your CSV includes extra columns beyond `phone_number`You can reference those in your assistant's instructions as variables. Your assistant will automatically use the right value for each contact it calls.
For example, if your CSV has a `name` column, add this to your instructions:
```text theme={null}
Always greet the caller by name. Their name is {{name}}.
```
Every call in the batch will open with a personalized greeting using that contact's actual name.
***
## Before you launch
Your Lead Batch is created and has contacts with valid phone numbers
Your AI Assistant is configured and tested using the Talk button
The call rate is set between 3 and 8 calls per minute
Your account has enough balance — click Add Fund if you need to top up
The calling time is appropriate for your contacts' time zone
***
## Where to go next
Full guide to creating and managing campaigns
Create and manage your Lead Batches
Review results and transcripts after the campaign runs
Read full transcripts of individual calls from the batch
Fill in:
* **Campaign Name**: e.g. *"June Outreach — Renewal Leads"*
* **Lead Batch**: pick the batch you just created
* **AI Assistant**: choose the assistant that'll handle the calls
* **Lead Filters**: optional; filter by lead status or score to target a segment of your batch
* **Call Rate**: set between **3 and 8 calls per minute** (recommended)
* **Schedule**: start immediately or pick a date and time
The call rate controls how many calls are made per minute. The dashboard recommends **3–8 calls per minute,** specifically to avoid spam detection by mobile carriers.
| Call Rate | Effect |
| --------- | ----------------------------------------------------- |
| 1–3/min | Very safe, but slower |
| 3–8/min | Recommended, good balance of speed and deliverability |
| 8+/min | Risk of carrier spam flags and lower answer rates |
Don't go above 8 calls per minute. You won't finish faster — carrier spam filters will reduce your connection rate, and you'll waste calls.
Click **Create Campaign**. If you set it to start immediately, your assistant starts dialing straight away. You'll see the progress bar start moving on the Campaigns page.
***
## Monitoring while it runs
Once your campaign is running, click on it to open the detail view:
* **Progress bar**: calls completed out of total contacts
* **Results breakdown**: how many connected, how many are qualified, failed, or unanswered
* **Live Updates toggle**: turn this on in the Calls page to see call results as they come in
***
## Campaign statuses
| Status | What it means |
| ----------- | ----------------------------------------------- |
| `Running` | The campaign is actively making calls right now |
| `Completed` | All contacts in the batch have been called |
| `Cancelled` | The campaign was manually stopped |
***
## Personalizing calls in a batch
If your CSV includes extra columns beyond `phone_number`You can reference those in your assistant's instructions as variables. Your assistant will automatically use the right value for each contact it calls.
For example, if your CSV has a `name` column, add this to your instructions:
```text theme={null}
Always greet the caller by name. Their name is {{name}}.
```
Every call in the batch will open with a personalized greeting using that contact's actual name.
***
## Before you launch
Your Lead Batch is created and has contacts with valid phone numbers
Your AI Assistant is configured and tested using the Talk button
The call rate is set between 3 and 8 calls per minute
Your account has enough balance — click Add Fund if you need to top up
The calling time is appropriate for your contacts' time zone
***
## Where to go next
Full guide to creating and managing campaigns
Create and manage your Lead Batches
Review results and transcripts after the campaign runs
Read full transcripts of individual calls from the batch