> ## Documentation Index
> Fetch the complete documentation index at: https://docs.tryorato.com/llms.txt
> Use this file to discover all available pages before exploring further.
# Leads
> Organise your contacts into Lead Batches for targeted outbound campaigns. Add leads manually or import via CSV upload.
## Overview
The **Leads** section is where you manage all your contacts. Leads are grouped into **Lead Batches** - organised lists you assign to Campaigns for automated calling.
 You need at least one Lead Batch with contacts before you can create a Campaign.
***
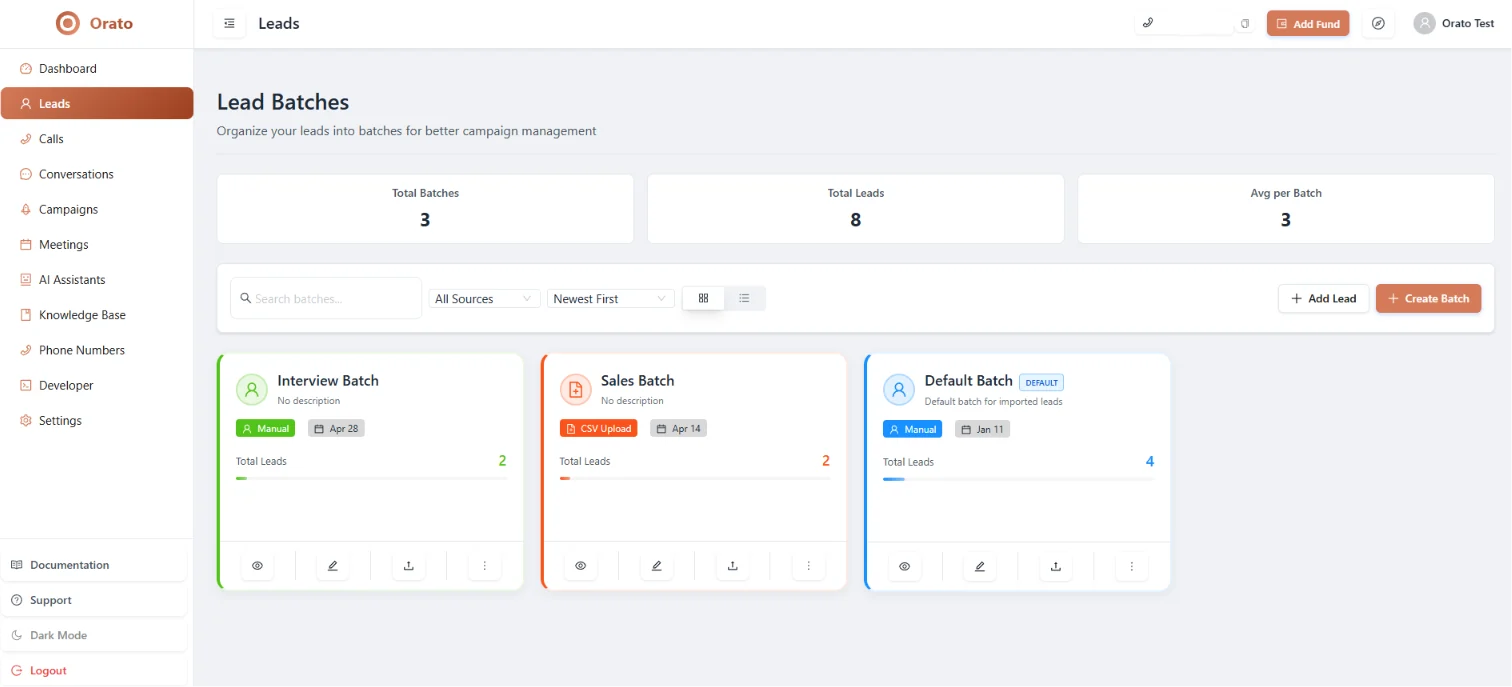
## Lead Batches dashboard
Three stats are shown at the top:
Number of lead batches in your account
Combined contacts across all batches
Average contacts per batch
Each batch card shows its **name**, **source** (Manual or CSV Upload), **date created**, and **total leads** with a progress bar.
***
## Creating a Lead Batch
From the Leads page, click **+ Create Batch** in the top right corner.
Use a clear, descriptive name - e.g. *"May 2026 — Real Estate Inbound"* or *"Webinar Signups - April"*.
Click **+ Add Lead** and enter contact details one by one.
Best for small lists or adding individual leads as they come in.
Click **CSV Upload** and import a file. Your CSV must include at minimum a `phone_number` column in international format.
**Example CSV:**
```csv theme={null}
phone_number,name,email,company
+14155551234,Sarah Chen,sarah@acme.com,Acme Corp
+919876543210,Priya Sharma,priya@zest.in,Zest Ltd
```
All phone numbers must be in international format — `+1` for US, `+91` for India. Invalid numbers will fail to connect during the campaign.
***
## Managing batches
Each batch card has action buttons at the bottom:
| Action | What it does |
| --------------- | --------------------------------------- |
| 👁️ **View** | Open the batch and see all leads inside |
| ✏️ **Edit** | Rename or update the batch description |
| ⬇️ **Download** | Export the full batch as a CSV |
| ⋯ **More** | Delete or additional options |
***
## Searching and filtering
Use the controls at the top of the Leads page to find specific batches:
* **Search batches**: search by batch name
* **All Sources**: filter by Manual or CSV Upload
* **Newest First / Oldest First**: sort by creation date
* **Grid / List view**: toggle between card and table layouts
***
## Best practices
**Name batches with context.** Include the date and lead source: e.g. *"Jun 2026 - Website Signups"*. This makes it easy to pick the right batch when setting up a Campaign.
**Keep batches focused.** One batch per campaign type performs better than one large mixed list. Lead filters in Campaigns work best when batches are segmented.
**Don't call contacts without consent.** Ensure you have the legal right to call everyone in your batch. Regulations like TCPA (US) and TRAI (India) apply to automated outbound calling.
***
## Next steps
Use your Lead Batch to launch an outbound calling campaign
Configure the assistant that will call your leads
You need at least one Lead Batch with contacts before you can create a Campaign.
***
## Lead Batches dashboard
Three stats are shown at the top:
Number of lead batches in your account
Combined contacts across all batches
Average contacts per batch
Each batch card shows its **name**, **source** (Manual or CSV Upload), **date created**, and **total leads** with a progress bar.
***
## Creating a Lead Batch
From the Leads page, click **+ Create Batch** in the top right corner.
Use a clear, descriptive name - e.g. *"May 2026 — Real Estate Inbound"* or *"Webinar Signups - April"*.
Click **+ Add Lead** and enter contact details one by one.
Best for small lists or adding individual leads as they come in.
Click **CSV Upload** and import a file. Your CSV must include at minimum a `phone_number` column in international format.
**Example CSV:**
```csv theme={null}
phone_number,name,email,company
+14155551234,Sarah Chen,sarah@acme.com,Acme Corp
+919876543210,Priya Sharma,priya@zest.in,Zest Ltd
```
All phone numbers must be in international format — `+1` for US, `+91` for India. Invalid numbers will fail to connect during the campaign.
***
## Managing batches
Each batch card has action buttons at the bottom:
| Action | What it does |
| --------------- | --------------------------------------- |
| 👁️ **View** | Open the batch and see all leads inside |
| ✏️ **Edit** | Rename or update the batch description |
| ⬇️ **Download** | Export the full batch as a CSV |
| ⋯ **More** | Delete or additional options |
***
## Searching and filtering
Use the controls at the top of the Leads page to find specific batches:
* **Search batches**: search by batch name
* **All Sources**: filter by Manual or CSV Upload
* **Newest First / Oldest First**: sort by creation date
* **Grid / List view**: toggle between card and table layouts
***
## Best practices
**Name batches with context.** Include the date and lead source: e.g. *"Jun 2026 - Website Signups"*. This makes it easy to pick the right batch when setting up a Campaign.
**Keep batches focused.** One batch per campaign type performs better than one large mixed list. Lead filters in Campaigns work best when batches are segmented.
**Don't call contacts without consent.** Ensure you have the legal right to call everyone in your batch. Regulations like TCPA (US) and TRAI (India) apply to automated outbound calling.
***
## Next steps
Use your Lead Batch to launch an outbound calling campaign
Configure the assistant that will call your leads