> ## Documentation Index
> Fetch the complete documentation index at: https://docs.tryorato.com/llms.txt
> Use this file to discover all available pages before exploring further.
# Quick Start
> Create your Orato AI Assistant and make a live call in under 5 minutes.
## What you'll achieve
By the end of this guide, you'll have a working AI Assistant that makes real phone calls or runs on your website as a voice widget.
You'll need an Orato account. Sign up at [app.tryorato.com](https://app.tryorato.com) if you haven't already.
***
## Create your first AI Assistant
In the left sidebar, click **AI Assistants**, then click **+ Create Assistant**.
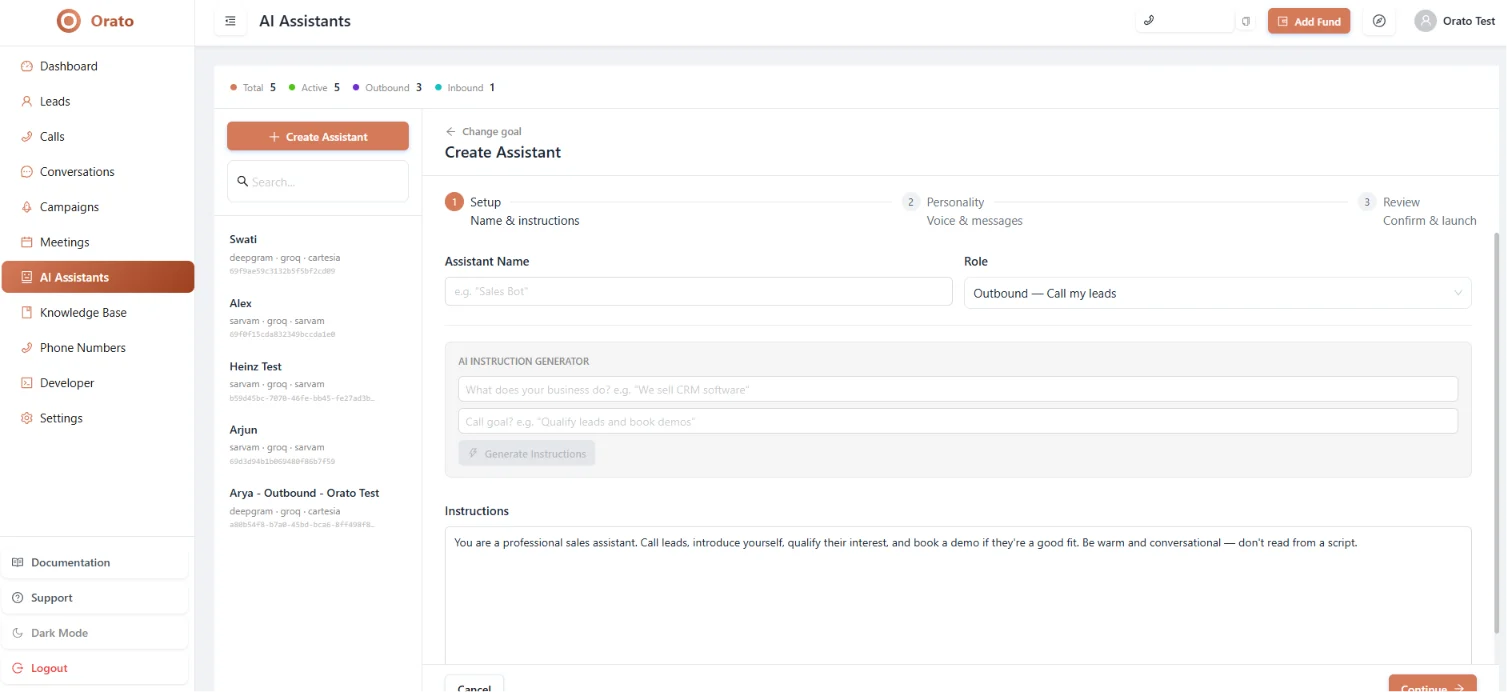 Enter your assistant's name and select a role (**Web Widget** for website, or **Phone** for calls).
Then use the **AI Instruction Generator**:
* Field 1: *"What does your business do?"* - e.g. `We sell CRM software for real estate agents`
* Field 2: *"Call goal?"* - e.g. `Qualify leads and book demos`
* Click **Generate Instructions**
Orato writes a structured, voice-optimised prompt for you. Edit the text directly to match your tone.
The generator enforces voice-first rules - responses stay under 2 sentences, no bullet points or emojis. This keeps your assistant sounding natural on calls.
Choose your **AI Brain (LLM)**:
Llama 3.3 70B: ultra-low latency. Best for phone calls where response speed matters most.
Claude: nuanced, thoughtful responses. Best for complex sales or support conversations.
GPT-4: reliable all-round choice for most use cases.
Choose your **Voice**:
sonic-2 model - natural, low-latency. Click **Preview** to hear it before choosing.
Wide selection of highly natural voices.
Best for Indian audiences — Hindi, Hinglish, and Indian English accents.
Set your **Opening Message** - write your own greeting or let AI generate it based on caller context.
Check your full configuration summary - name, voice, AI model, opening, and closing. Optionally attach a Knowledge Base document.
Click **Update Assistant** to save.
Click **Talk** (top right) to test your assistant in the browser immediately after saving.
***
## Make your first call
Click **Campaigns** in the sidebar, then **+ Create Campaign**.
Go to **Leads → Create Batch**. Add a contact manually or upload a CSV with at least a `phone_number` column.
Select your Lead Batch and your AI Assistant. Set call rate to **5 calls/min** (recommended). Click **Create Campaign** - your assistant starts calling immediately.
Get your API key from **Developer → API Keys**, then trigger a call:
```bash theme={null}
curl --request POST \
--url https://api.tryorato.com/v1/call \
--header 'Authorization: Bearer YOUR_API_KEY' \
--header 'Content-Type: application/json' \
--data '{
"assistant_id": "your-assistant-id",
"recipient_phone_number": "+1234567890"
}'
```
Add this script to your website's `` or ``:
```html theme={null}
```
A floating microphone button appears on your site. Visitors click it to speak to your assistant instantly.
***
## Before you go live
Test your assistant using the **Talk** button in the dashboard
Review the conversation transcript after testing — check for unnatural responses
Set up a Phone Number if you need inbound or outbound calling
Connect your calendar in **Settings → Calendar** if your assistant books meetings
Upload Knowledge Base documents if your assistant needs to answer product questions
***
## Next steps
Deep dive into all assistant configuration options
Launch your first outbound calling campaign
Upload documents for accurate answers on every call
Integrate Orato into your own application
Enter your assistant's name and select a role (**Web Widget** for website, or **Phone** for calls).
Then use the **AI Instruction Generator**:
* Field 1: *"What does your business do?"* - e.g. `We sell CRM software for real estate agents`
* Field 2: *"Call goal?"* - e.g. `Qualify leads and book demos`
* Click **Generate Instructions**
Orato writes a structured, voice-optimised prompt for you. Edit the text directly to match your tone.
The generator enforces voice-first rules - responses stay under 2 sentences, no bullet points or emojis. This keeps your assistant sounding natural on calls.
Choose your **AI Brain (LLM)**:
Llama 3.3 70B: ultra-low latency. Best for phone calls where response speed matters most.
Claude: nuanced, thoughtful responses. Best for complex sales or support conversations.
GPT-4: reliable all-round choice for most use cases.
Choose your **Voice**:
sonic-2 model - natural, low-latency. Click **Preview** to hear it before choosing.
Wide selection of highly natural voices.
Best for Indian audiences — Hindi, Hinglish, and Indian English accents.
Set your **Opening Message** - write your own greeting or let AI generate it based on caller context.
Check your full configuration summary - name, voice, AI model, opening, and closing. Optionally attach a Knowledge Base document.
Click **Update Assistant** to save.
Click **Talk** (top right) to test your assistant in the browser immediately after saving.
***
## Make your first call
Click **Campaigns** in the sidebar, then **+ Create Campaign**.
Go to **Leads → Create Batch**. Add a contact manually or upload a CSV with at least a `phone_number` column.
Select your Lead Batch and your AI Assistant. Set call rate to **5 calls/min** (recommended). Click **Create Campaign** - your assistant starts calling immediately.
Get your API key from **Developer → API Keys**, then trigger a call:
```bash theme={null}
curl --request POST \
--url https://api.tryorato.com/v1/call \
--header 'Authorization: Bearer YOUR_API_KEY' \
--header 'Content-Type: application/json' \
--data '{
"assistant_id": "your-assistant-id",
"recipient_phone_number": "+1234567890"
}'
```
Add this script to your website's `` or ``:
```html theme={null}
```
A floating microphone button appears on your site. Visitors click it to speak to your assistant instantly.
***
## Before you go live
Test your assistant using the **Talk** button in the dashboard
Review the conversation transcript after testing — check for unnatural responses
Set up a Phone Number if you need inbound or outbound calling
Connect your calendar in **Settings → Calendar** if your assistant books meetings
Upload Knowledge Base documents if your assistant needs to answer product questions
***
## Next steps
Deep dive into all assistant configuration options
Launch your first outbound calling campaign
Upload documents for accurate answers on every call
Integrate Orato into your own application